Generating automatic image descriptions : An encoder-decoder model with pytorch
Image captioning, a field of study in image analysis, focuses on the ability of algorithms to describe the content of an image by a text, generally one or a few sentences.
The publication Show, Attend and Tell: Neural Image Caption Generation with Visual Attention, by Kelvin Xu et al, proposes an architecture allowing to associate a descriptive sentence to an image. It consists of a convolutional neural network (CNN) and a recurrent network (RNN) allowing to generate coherent sentences related to the image. We will briefly describe here the functioning of such an architecture, and try to produce descriptions of our own.
Part 1: The CNN
A traditional method of machine learning to extract information from an image is the use of neural networks, and more particularly the CNN. They apply convolutions on the surface of the image, allowing to detect patterns of more or less high level, and to associate these patterns to the characteristics of such or such object.
When training the network, it learns both the characteristics of the convolutions to be applied, and to which content to associate these patterns: face, car, cat, etc…
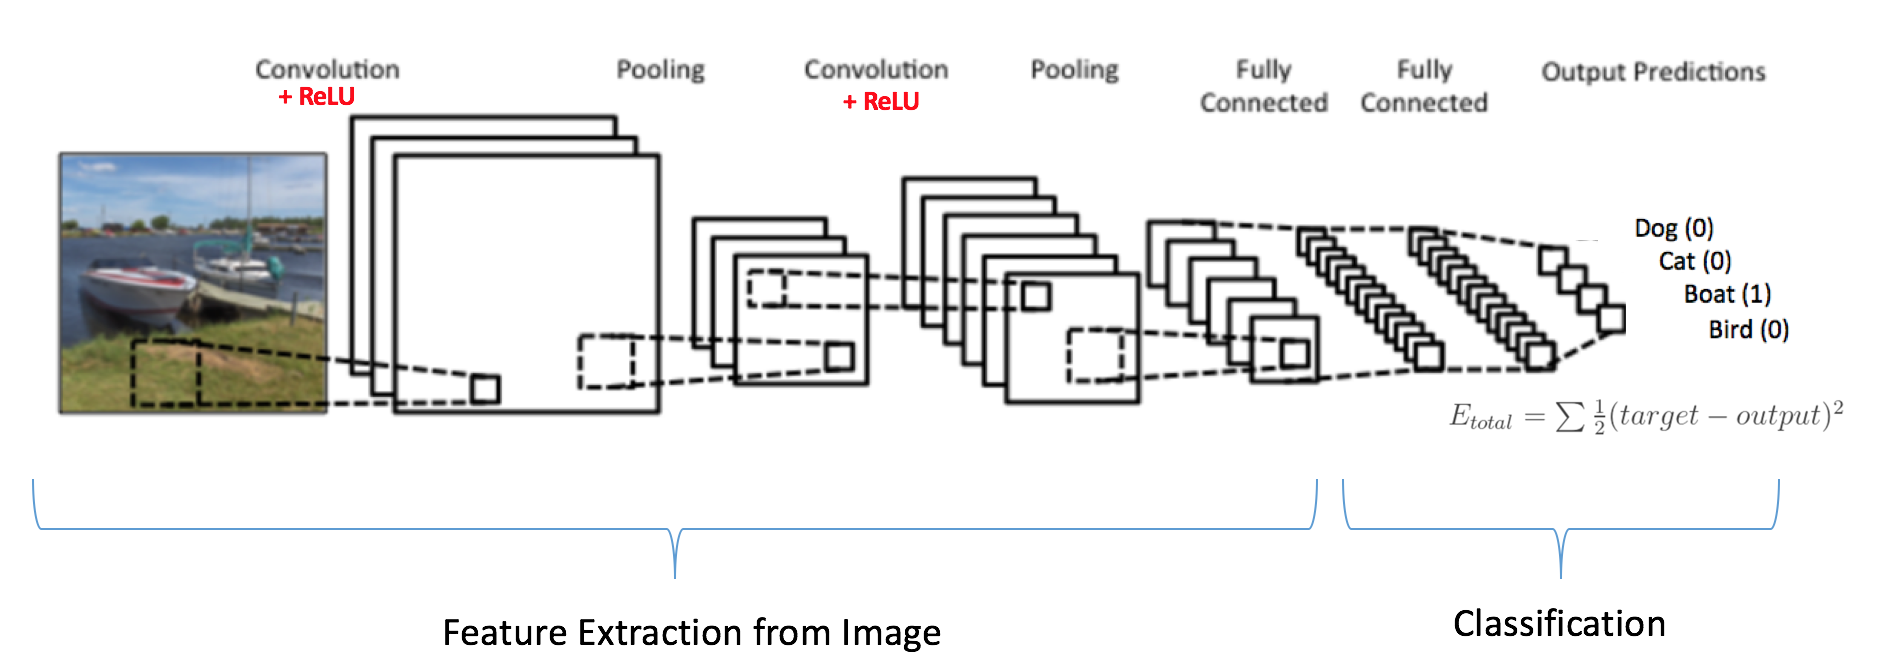
The traditional architecture of a CNN includes several successive convolution/normalization steps, followed by a so-called dense layer, where all neurons are connected (located on the right side of the diagram):
 (source: Kaggle.com)
The output size of the dense layer is the number of classes the network can recognize.
CNNs trained on large image databases are available on the Internet. Among them, AlexNet, a CNN trained on the ImageNet image database (1.2 million images of 1000 different classes), and published in 2012, still remains a reference of pre-trained model.
Here, we do not want to associate an image with this or that class, but rather write a descriptive sentence about it. Even limiting the maximum sentence size, the number of different possible sentences is far too large to associate each one with an output neuron of the final layer.
Xu et al show that it is however possible to use the representational capacity of a trained CNN to accomplish this task. They use the layers dedicated to convolution/normalization, necessary to extract the image features, but decide to extract the generated vector at the end of it, and not to use the last layer dedicated to classification.
Each image is thus transformed into a vector I of fixed size :
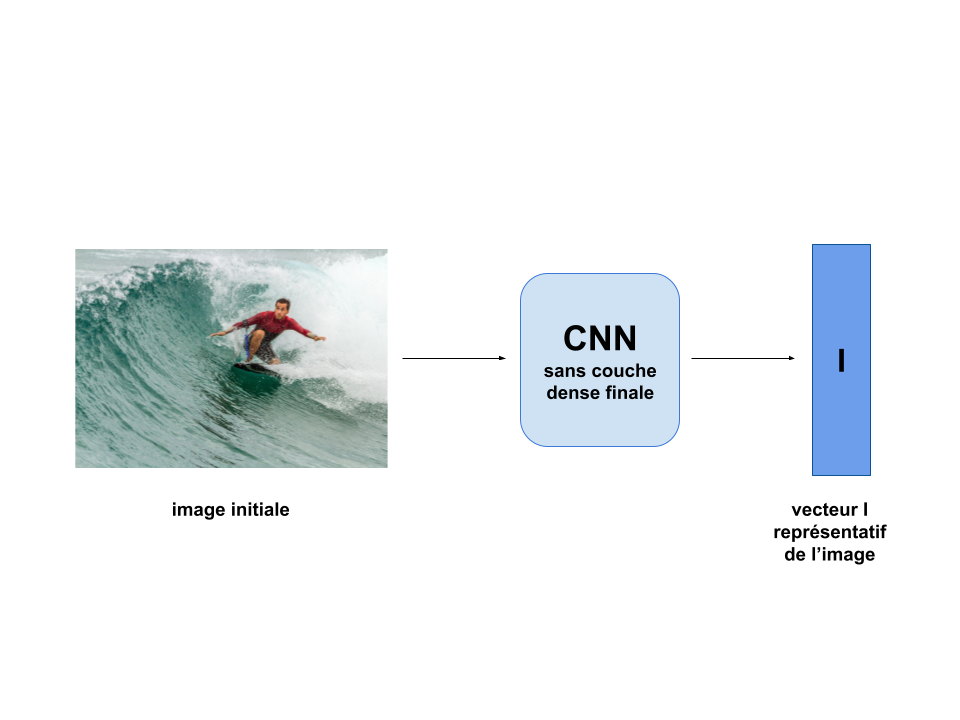 This vector contains some information about the image, even if it is uninterpretable as it is. Xu and Al will use another neural network, a RNN, to generate the description sentence from this vector.
Part 2 : The RNN
RNNs are another type of neural network architecture, particularly used in tasks involving sequential processing of information.
As in most architectures, these networks take a vector as input, and give a vector as result. However, they are constructed in such a way that the result vector depends on the input vector, but also on the previously received input vectors.
This works because at each step of the processing, a part of the neurons of the network keeps their state from the previous step. This ability is particularly useful for tasks that require “memorization” of steps over time, such as audio or text processing.
Xu and Al use it for image description generation: Here the RNN takes as state the representative vector I generated in the previous step.
We put in input of the RNN a potential first word for the description, for example the word “Un “. The RNN generates another word, for example “man “, by modifying its state.
It is this new state that will be used when generating the next word.
img6en](/assets/images/img_captioning/im6en.png)
The RNN generates sequentially a sentence, word by word. Initially, without training the network, these words will be random and will have no relation with the initial image. We will now train it on a large number of images:
Part 3: The data
We will train our architecture on the COCO database. This database contains hundreds of thousands of annotated images, and is available for download at https://cocodataset.org/.
We download the file annotations_trainval2014.zip, containing the information of each image of the database as of 2014, and we use the pycocotools library, which contains functions allowing us to easily manipulate this information.
from pycocotools.coco import COCO

coco = COCO("instances_train2014.json") #COCO class instance, containing information about each image
coco_caps = COCO("captions_train2014.json") #instance containing the descriptions (several per image)


ids = list(coco.anns.keys()) #list of image identifiers
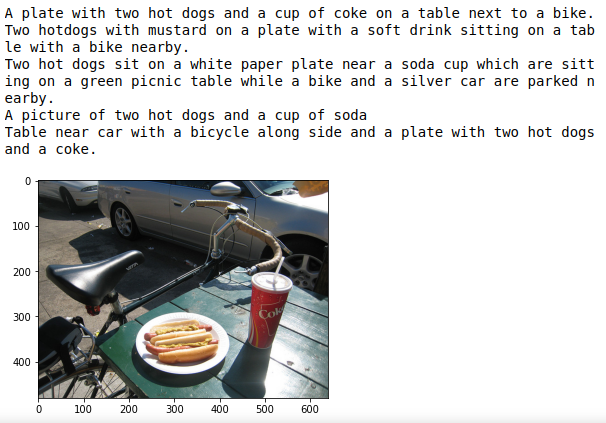
We can display an image of our database, as well as its associated descriptions:
#import of some libraries for display and navigation
import matplotlib.pyplot as plt
import skimage.io as io
import numpy as np
%matplotlib inline

#extraction of the first id of the database
ann_id = ids[1]

#display of the image and its url
img_id = coco.anns[ann_id]['image_id']
img = coco.loadImgs( img_id )[0]
url = img['coco_url']
print(url)
I = io.imread(url)
plt.imshow(I)

#displaying descriptions
ann_ids = coco_caps.getAnnIds( img_id   )
anns = coco_caps.loadAnns( ann_ids )
coco_caps.showAnns(anns)
Part 4: Text processing
To allow the RNN to process the sentences, we will divide them into tokens, units of information that the network will be able to process one by one. Each word or symbol encountered in the text of the database will be associated with a token, itself indexed by an index in a dictionary. We also create 3 specific tokens, reserved for the understanding of the text:
<start> will indicate the beginning of a description, <end> will indicate the end, and <unk> will be used to indicate possible words not listed in the dictionary.
"""creation of two dictionaries : word2idx and idx2word, to quickly switch
from a token to its corresponding index"""
word2idx = {'<start>': 0,
 '<end>': 1,
 '<unk>': 2}
idx2word = {0: '<start>',
 1: '<end>',
 2: '<unk>'}

idx = 3

"""Creation of a counter including all the tokens read in the descriptions """
coco = COCO("annotations/captions_train2014.json")
counter = Counter()
ids = coco.anns.keys()
for i, id in enumerate(ids):
    caption = str(coco.anns[id]['caption'])
    tokens = nltk.tokenize.word_tokenize(caption.lower())
    counter.update(tokens)

    if i % 100000 == 0:
        print("[%d/%d] Tokenizing captions..." % (i, len(ids)))

""" Addition in the dictionaries word2idx and idx2word
of all words appearing more than 8 times"""
vocab_threshold = 8
words = [word for word, cnt in counter.items() if cnt >= vocab_threshold]

for i, word in enumerate(words):
    if not word in word2idx:
        word2idx[word] = idx
        idx2word[idx] = word
        idx += 1

len(word2idx) #taille du vocabulaire : 7072 tokens
Part 5: Image processing
As for the text of the descriptions, the image must be put in vector form to be processed by the network. We also normalize it to make it more easily interpretable by the CNN used.
We will create our architecture via the libraries pytorch and torchvision . These libraries integrate useful functions for pre-processing, such as transforms :
from torchvision import transforms

transform_train = transforms.Compose([
    transforms.Resize(256),                          # reduction to size 256 * 256
    transforms.ToTensor(),                           # conversion image->tensor
    transforms.Normalize((0.485, 0.456, 0.406),      # normalization
                         (0.229, 0.224, 0.225))])
Part 6: Training preparation
We have now all the necessary information to train our network. Pytorch has a pre-defined class representing the datasets, and it is possible to create a class inherited from it to manipulate them more easily. A detailed tutorial available on the Pytorch site, but in summary, two methods of the class must be rewritten according to our dataset:
- The
__getitem__method, so thatdataset[i]returns the ith item, - The
__len__method, so thatlen(dataset)returns the size of the dataset.
We create the inherited class CoDataset :
import torch.utils.data as data
class CoCoDataset(data.Dataset):

    def __init__(self, transform, mode, batch_size, vocab_threshold, vocab_file, start_word,
        end_word, unk_word, annotations_file, vocab_from_file, img_folder):
        self.transform = transform
        self.mode = mode
        self.batch_size = batch_size
        self.img_folder = img_folder
        if self.mode == 'train':
            self.coco = COCO(annotations_file)
            self.ids = list(self.coco.anns.keys())
            print('Obtaining caption lengths...')
            all_tokens = [nltk.tokenize.word_tokenize(str(self.coco.anns[self.ids[index]]['caption']).lower()) for index in tqdm(np.arange(len(self.ids)))]
            self.caption_lengths = [len(token) for token in all_tokens]
        else:
            test_info = json.loads(open(annotations_file).read())
            self.paths = [item['file_name'] for item in test_info['images']]

    def __getitem__(self, index):
               # get the image and description
        if self.mode == 'train':
            ann_id = self.ids[index]
            caption = self.coco.anns[ann_id]['caption']
            img_id = self.coco.anns[ann_id]['image_id']
            path = self.coco.loadImgs(img_id)[0]['file_name']

            # Convert the image to a tensor
            image = Image.open(os.path.join(self.img_folder, path)).convert('RGB')
            image = self.transform(image)

            # Convert the sentence into tokens, then into ids
            tokens = nltk.tokenize.word_tokenize(str(caption).lower())
            caption = []

            caption.append(word2idx['<start>'])
            caption.extend([word2idx[token] if token in word2idx else word2idx['<unk>'] for token in tokens])
            caption.append(word2idx['<end>'])

            caption = torch.Tensor(caption).long()

            return image, caption

        else:
            path = self.paths[index]

            PIL_image = Image.open(os.path.join(self.img_folder, path)).convert('RGB')
            orig_image = np.array(PIL_image)
            image = self.transform(PIL_image)

            return orig_image, image

    def get_train_indices(self):
        sel_length = np.random.choice(self.caption_lengths)
        all_indices = np.where([self.caption_lengths[i] == sel_length for i in np.arange(len(self.caption_lengths))])[0]
        indices = list(np.random.choice(all_indices, size=self.batch_size))
        return indices

    def __len__(self):
        if self.mode == 'train':
            return len(self.ids)
        else:
            return len(self.paths)
We then create our dataset class instance :
from tqdm import tqdm

img_folder = 'cocoapi/images/train2014/'
annotations_file = 'cocoapi/annotations/captions_train2014.json'

os.chdir('/media/tidiane/D:/Dev/CV/Image_captioning')

dataset = CoCoDataset(transform=transform_train,
                          mode="train",
                          batch_size=200,
                          vocab_threshold=8,
                          vocab_file='./vocab.pkl',
                          start_word='<start>',
                          end_word='<end>',
                          unk_word='<unk>',
                          annotations_file=annotations_file,
                          vocab_from_file=False,
                          img_folder=img_folder)

num_workers=0
# Randomly sample a caption length, and sample indices with that length.
indices = dataset.get_train_indices()
# Create and assign a batch sampler to retrieve a batch with the sampled indices.
initial_sampler = data.sampler.SubsetRandomSampler(indices=indices)
# data loader for COCO dataset.
data_loader = data.DataLoader(dataset=dataset,
                                      num_workers=num_workers,
                                      batch_sampler=data.sampler.BatchSampler(sampler=initial_sampler,
                                                                              batch_size=dataset.batch_size,
                                                                              drop_last=False))
Part 7 : The architecture
We can now build our architecture:
For the CNN, we use the network resnet50, already included in the torchvision library. As previously mentioned, we remove the last layer of the network, and replace it with a layer of output size 256. The I vector representing each image will thus have this size.
import torch.nn as nn
import torchvision.models as models

embed_size = 256

class EncoderCNN(nn.Module):
    def __init__(self, embed_size):
        super(EncoderCNN, self).__init__()
        resnet = models.resnet50(pretrained=True) #import de resnet50
        for param in resnet.parameters():
            param.requires_grad_(False)

        modules = list(resnet.children())[:-1]
        self.resnet = nn.Sequential(*modules)
        self.embed = nn.Linear(resnet.fc.in_features, embed_size)

    def forward(self, images):
        features = self.resnet(images)
        features = features.view(features.size(0), -1)
        features = self.embed(features)
        return features
For the RNN, we build a recurrent network of input size 256
hidden_size = 100
vocab_size = len(word2idx)

class DecoderRNN(nn.Module):
    def __init__(self, embed_size, hidden_size, vocab_size, num_layers=1):
        super( DecoderRNN , self).__init__()
        self.embed_size = embed_size
        self.hidden_size = hidden_size
        self.vocab_size = vocab_size
        self.num_layers = num_layers
        self.word_embedding = nn.Embedding( self.vocab_size , self.embed_size )
        self.lstm  = nn.LSTM(    input_size  =  self.embed_size ,
                             hidden_size = self.hidden_size,
                             num_layers  = self.num_layers ,
                             batch_first = True
                             )
        self.fc = nn.Linear( self.hidden_size , self.vocab_size  )


    def init_hidden( self, batch_size ):
      return ( torch.zeros( self.num_layers , batch_size , self.hidden_size  ).to(device),
      torch.zeros( self.num_layers , batch_size , self.hidden_size  ).to(device) )

    def forward(self, features, captions):
      captions = captions[:,:-1]
      self.batch_size = features.shape[0]
      self.hidden = self.init_hidden( self.batch_size )
      embeds = self.word_embedding( captions )
      inputs = torch.cat( ( features.unsqueeze(dim=1) , embeds ) , dim =1  )
      lstm_out , self.hidden = self.lstm(inputs , self.hidden)
      outputs = self.fc( lstm_out )
      return outputs

    def Predict(self, inputs, max_len=20):
        final_output = []
        batch_size = inputs.shape[0]
        hidden = self.init_hidden(batch_size)

        while True:
            lstm_out, hidden = self.lstm(inputs, hidden)
            outputs = self.fc(lstm_out)
            outputs = outputs.squeeze(1)
            _, max_idx = torch.max(outputs, dim=1)
            final_output.append(max_idx.cpu().numpy()[0].item())
            if (max_idx == 1 or len(final_output) >=20 ):
                break

            inputs = self.word_embedding(max_idx)
            inputs = inputs.unsqueeze(1)
        return final_output
Part 8: Training the network
We can finally train our network:
import math
import pickle

device =  torch.device('cuda' if torch.cuda.is_available() else 'cpu')

encoder = EncoderCNN( embed_size )

decoder = DecoderRNN(  embed_size , hidden_size, vocab_size ,num_layers)

encoder.to(device)

images=  images.to(device)
features = encoder(images)


batch_size = 200
num_layers =1
num_epochs = 4
print_every = 1 #150
save_every = 1

total_step = math.ceil( len(data_loader.dataset.caption_lengths) / data_loader.batch_sampler.batch_size   )


criterion = nn.CrossEntropyLoss()
lr = 0.001
all_params = list(decoder.parameters())  + list( encoder.embed.parameters() )
optimizer = torch.optim.Adam( params  = all_params , lr = lr  )


device =  torch.device('cuda' if torch.cuda.is_available() else 'cpu')
model_save_path = 'models'
os.makedirs( model_save_path , exist_ok=True)

# Save the params needed to created the model :
decoder_input_params = {'embed_size' : embed_size ,
                'hidden_size' : hidden_size ,
                'num_layers' : num_layers,
                'lr' : lr ,
                'vocab_size' : vocab_size
                }

with open(  os.path.join(model_save_path , 'decoder_input_params_12_20_2019.pickle'), 'wb') as handle:
    pickle.dump(decoder_input_params, handle, protocol=pickle.HIGHEST_PROTOCOL)
import sys
for e in range(num_epochs):
  for step in range(total_step):
    indices = data_loader.dataset.get_train_indices()
    new_sampler = data.sampler.SubsetRandomSampler( indices )
    data_loader.batch_sampler.sampler = new_sampler
    images,captions = next(iter(data_loader))
    images , captions = images.to(device) , captions.to(device)
    encoder , decoder = encoder.to(device) , decoder.to(device)
    encoder.zero_grad()
    decoder.zero_grad()
    features = encoder(images)
    output = decoder( features , captions )
    loss = criterion( output.view(-1, vocab_size) , captions.view(-1) )
    loss.backward()
    optimizer.step()
    stat_vals = 'Epochs [%d/%d] Step [%d/%d] Loss [%.4f] ' %( e+1,num_epochs,step,total_step,loss.item() )
    if step % print_every == 0 :
      print(stat_vals)
      sys.stdout.flush()
    if e % save_every == 0:
      torch.save( encoder.state_dict() ,  os.path.join( model_save_path , 'encoderdata_{}.pkl'.format(e+1) ) )
      torch.save( decoder.state_dict() ,  os.path.join( model_save_path , 'decoderdata_{}.pkl'.format(e+1) ) )
Partie 9 : Test de notre architecture
cocoapi_loc=''

img_folder_test = os.path.join(cocoapi_loc, 'cocoapi/images/test2014/')
annotations_file_test = os.path.join(cocoapi_loc, 'cocoapi/annotations/image_info_test2014.json')

transform_test = transforms.Compose([
    transforms.Resize(256),                          # smaller edge of image resized to 256
    #transforms.RandomCrop(224),                      # get 224x224 crop from random location
    transforms.RandomHorizontalFlip(),               # horizontally flip image with probability=0.5
    transforms.ToTensor(),                           # convert the PIL Image to a tensor
    transforms.Normalize((0.485, 0.456, 0.406),      # normalize image for pre-trained model
                         (0.229, 0.224, 0.225))])


dataset_test = CoCoDataset(transform=transform_test,
                          mode='test',
                          batch_size = 1,
                          vocab_threshold=vocab_threshold,
                          vocab_file=' ',
                          start_word=start_word,
                          end_word=end_word,
                          unk_word=unk_word,
                          annotations_file=annotations_file_test,
                          vocab_from_file=False,
                          img_folder=img_folder_test)

data_loader_test = data.DataLoader(dataset=dataset_test,
                                      batch_size=dataset_test.batch_size,
                                      shuffle=True,
                                      num_workers=num_workers)


data_iter = iter(data_loader_test)

def get_sentences( original_img, all_predictions ):
    sentence = ' '
    plt.imshow(original_img.squeeze())
    return sentence.join([idx2word[idx] for idx in all_predictions[1:-1] ]  )

model_save_path = '/media/tidiane/D:/Dev/CV/Image_captioning/models/drive-download-20210428T070757Z-001'
os.makedirs( model_save_path , exist_ok=True)

device =  torch.device('cuda' if torch.cuda.is_available() else 'cpu')

with open(  os.path.join(model_save_path , 'decoder_input_params_12_20_2019.pickle'), 'rb') as handle:
    decoder_input_params = pickle.load(handle)

embed_size = decoder_input_params['embed_size']
hidden_size= decoder_input_params['hidden_size']
vocab_size = decoder_input_params['vocab_size']
num_layers = decoder_input_params['num_layers']

encoder = EncoderCNN( embed_size )
encoder.load_state_dict(   torch.load(  os.path.join( model_save_path , 'encoderdata_{}.pkl'.format(4) )   ,map_location=torch.device('cpu')) )

decoder = DecoderRNN( embed_size , hidden_size , vocab_size , num_layers )
decoder.load_state_dict( torch.load(   os.path.join( model_save_path , 'decoderdata_{}.pkl'.format(4) )  ,map_location=torch.device('cpu') ) )

encoder.to(device)
decoder.to(device)
encoder.eval()
decoder.eval()
original_img , processed_img  = next( data_iter )

features  = encoder(processed_img.to(device)   ).unsqueeze(1)
final_output = decoder.Predict( features  , max_len=20)
get_sentences(original_img, final_output)
Here is a result of the model on previously unseen data :
